A Case of Deploying a web application which includes WCF, Silverlight and ASP.NET part 1
We have a web application which was developed using ASP.NET 4.0 (Web Forms), Silverlight 4.0 and WCF 4.0.
Brief information about our application
1: We use WCF to provide all data to clients, some data are from database, another part of data are from a real time data resource;
2: We use self host for the WCF service, which host the WCF on a standalone WPF application, the real time data resource is exactly from the WPF application;
3: All clients are the web pages which using Silverlight, Silverlight content hosted on ASP.NET web form pages.
Here I am going to talk about deployment of our web application, we deploy it to our different customers.
Deployment
I will introduce the whole deployment process using 4 parts:
A> Web Server; B> WCF project; C> Silverlight project; D> Web site.
A> Web server (IIS):
Actually we should not too worry about the settings on web server (IIS), because most of time the customer should arrange their own network administrator (or call other name but just an administrator) to handle this part.
What I suggest is that using IIS 7 or above, which matches and supports well most of ASP.NET web applications especially new ASP.NET techs.
And, we need to create 2 Applications (on IIS 7, the "Add Application" is different from "Add Virtual Directory" ) on IIS, the one is for WCF service, another one is for Web site.
(Update: Actually, for WCF self host mode, we do not need to add an application for WCF, because the WCF service URL has been already set in the host program. So please know we ONLY need one application folder for website project below.)
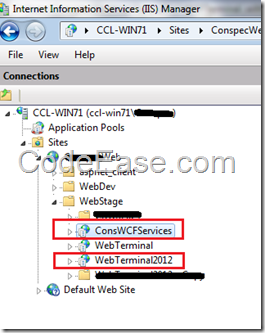
You can check the following image, for our case, we created 2 virtual folders on our IIS server:
ConsWCFServices virtual folder is for our WCF service project; Update: Do NOT need this one)
WebTerminal2012 virtual folder is for our Web site project;
B> WCF project:
Before we put our WCF project content on the corresponding virtual folder which I introduced above, we need to set the WCF configuration, to let WCF work correctly.
If you choose other WCF host mode but not self host. for example you choose web server host mode, you have to copy your final WCF service content to IIS web server finally. However, please know in our case, we use WCF self host mode, so we actually DO NOT need to put any generated WCF conten on our IIS, what we should do just set right URLs to "image" our WCF service to IIS web server
Because we use a WPF application to host WCF, so we should open the WPF config file, which named xxxx.exe.config (xxxx is WPF project name, if you choose web server host, you need to find a config file maybe named web.config):
We should set 2 parts for WCF Service with the self host program:
- The first part is for database: here you need to change the database connection string. Put your database server name, your database name and your database user account information. But Please DO NOT change the connection string name! (for example, the following connection string’s name is SysDBConnString, then please do not change it.)

- The second part is for WCF services:
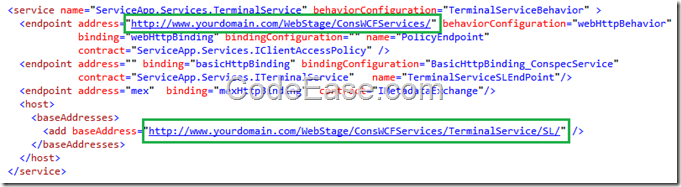
Please check the following settings, I have mentioned above, we need 2 virtual folders on IIS web server, but we just need to care about the WCF virtual folder here. Look at the following 2 URLs which wrapped by green boxes.
The first URL is for the the "famous WCF and Silverlight trouble" – The "Cross Domain issue". (Yes, if you want to know what it the cross domain trouble, you can check the link, I have posted a blog before about it).
Actually, you don’t need to know what the cross domain trouble is, just set a right URL here, please make sure the URL is the root virtual folder which your WCF service content will be located in. for example: suppose we are set a WCF service with a web server host mode (not like ours self host), we should created the web application folder such as ConsWCFServices on our IIS, which you can see in above IIS part. the root URL is just "http://www.yourdomain.com/WebStage/ConsWCFServices", it is a root virtual folder. This is very important, otherwise you will meet the famous cross domain trouble.
Update: For self host mode, we still need to a root virtual folder (web application root folder on IIS), but you just set it in the web configuration file, you DO NOT need to create an physical folder on IIS for a self host mode WCF service.
I can set (map) my WCF service content in the root folder, but I can choose NOT. Just like our case, the second URL is just our real WCF folder, we put (map) our WCF service program in the second URL. But please know you have to choose a sub folder under the root WCF virtual folder which you have set in the first URL. in our case, we choose a sub folder named "TerminalService/SL/", actually this sub folder is NOT exists on IIS server (and you do not need to create it either). but when you set this sub folder, you should make sure later you can get WCF service information through this sub folder, the full URL is http://wwww.yourmain.com/WebStage/ConsWCFServices/TerminalService/SL/ in our case.
OK, the WCF part set done. all you need to do now is just starting the WCF service on your hosting project.
After you done WCF config, please use a web browser to try to visit your WCF service, using the sub folder URL which I mentioned above: http://wwww.yourmain.com/WebStage/ConsWCFServices/TerminalService/SL/
In our case, we can get the WCF web service result, just like the following showing:
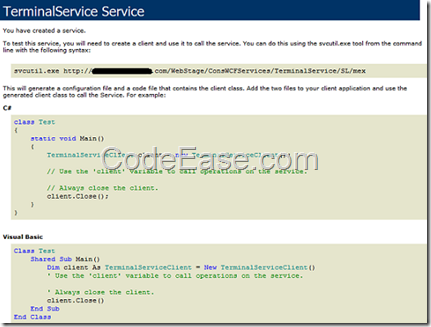
If you can not see the similar page, that means you have not set correct configuration for your WCF service project. Please double check your settings, and even have to contact with the web server administrator.
OK, let use pause here. so that we can make sure our WCF is working. See you guys on the part 2.